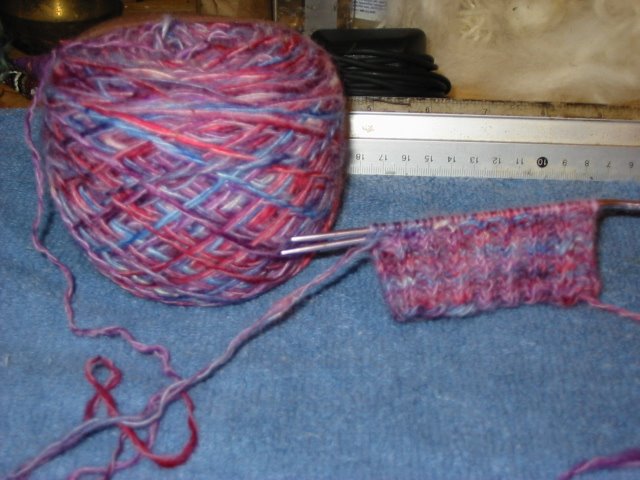
An idea of what the yarn I spun up looks like "In the Knit". You can't see it but the Alpaca in the ply is haloing and it is something wonderful to touch and look at! I am using size #2 US circulars.
Until next time...

Adventure Seeker - Crafting Extraordinaire
An idea of what the yarn I spun up looks like "In the Knit". You can't see it but the Alpaca in the ply is haloing and it is something wonderful to touch and look at! I am using size #2 US circulars.
Until next time...
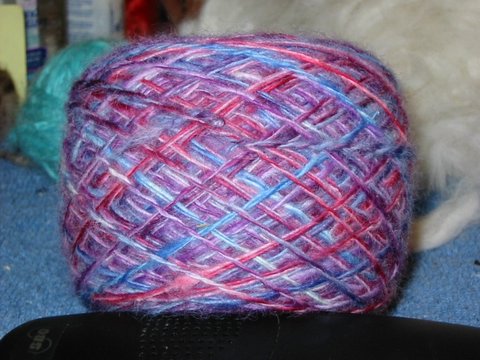 OOOOoooooo I could not have asked for a better combination of colors! They blended well and even left a few white specks where I had tied the skien to prevent tangling. The alpaca single did not dye very well for some unknown reason so it turned the yarn into tweed!!
 The WPI ended up at 15-16 per inch which makes it fingering wieght, suited for size 2, 3, or 4 needles. I have size two so I take a gander at toe up socks with this. I should have enough for a pair.
 I came across some oven dyeing instructions and decided to first take a gander with some fiber before I take a leap of faith and dye the HUGE skien of 2 ply sock yarn I have been spinning up for the past week. I wound it off my spinnin wheel onto the niddy-noddy that I had made recently with PVC and I found that it makes skiens that are almost 6 feet long!!! I am gonna have to adjust that. I don't like such huge skiens as I find them hard to work with.
 My sock yarn came out wonerfully! The purple and red mixed together A LOT which made this wonderfull dark red berry color. Then on one end there is pur blue and pure purple. The only thing I did not expect was the alpaca ply did not dye as much as the wool. It must not accept dye as easily but it created still another neat-o effect-Tweed!
MMMm my pickles came out so well this year! They are crunchy, not soggy like last years try.
Here's the recipie I used:
Cut ends of small pickling cukes, slice longways twice (or leave whole if smaller than 4 inches). Wash in cold water, place in bowl, sprinkle 1/3 cup kosher salt over them and add 2 inches of ICE on top. Place in fridge overnight and drain in the morning.
In a pan desolve 4 1/2 cups of sugar in 3 1/2 cups of apple cider vinegar, add 2 to 3 tables spoons of premixed pickling spices-simmer for 10 minutes. Preheat this mixture before pouring over raw cukes.
Place RAW cukes in warm to hot starilized jar (boil jars and lids in large pan for 10 minutes). What I do is boil the jars and lids right before packing them so the jars don't shatter. Be sure to use mason jars as most others will not tolerate the change in temps and will indeed shatter (don't ask me how I know this).
Pour warm pickling juice (the cider cooked with sugar and spices) over the RAW cukes, leaving 1/2 to 1/4 inch head to allow for steam, screw lid on ASAP and place into fridge right away.
Leave in fridge anywhere from 3-8 weeks. I usually cannot wait 8 weeks so I begin snacking on them after 6 weeks.
They come out sweet and crunchy!!
Place some garlic, onion, and/or peppers in with the pickles for some interesting flavorings and add variety in pickled items. I love sweet pickled cloves of garlic.
Until next time...
While surfing the net for more informaion on gradient dyeing, I stumbled across the following that I am gonna try with purple, blue, and red.
From Deanna:
For those of you who are interested, here are the instructions for the rainbow dyeing and casserole dyeing I talked about yesterday. They are basically the same thing: just different ways of "cooking" it.
Rainbow dyeing:
1/2 cup vinegar
1 lb fleece
enough water to just cover the fleece
2 squirts of dish detergent (Ivory suggested)
(if you are doing one colour only, add 1 tbsp Glauber's salt)
Put this all in a roasting pan, and look at the fleece in the pot as a circle divided into three "pie-shaped" thirds. Sprinkle CIBA dyes over the fleece: 1 colour in one-third, 2nd colour in 2nd third, 3rd colour in last third. Make sure the colours mix with each other at their dividing lines. Of each colour, sprinkle enough dye to lightly cover that particular third.
Poke down gently with a wooden spoon, so that the dye powders get diluted by the water. Let simmer for 1/2 hour at medium heat (you don't want it to boil.) Rinse 'til clear with lukewarm water, put in your washing machine on the spin cycle (I use a salad spinner!) to spin most of the moisture out of it, and allow to air dry.
Then you can card the fleece together, to get a heathered type colouring, or separate the colours to get a variety of different colour fleece.
Casserole method (the precise instructions, which I usually modify...):
Put water in a roasting pan to 1 inch depth. Add 2 tbsp white vinegar. Add skeined yarn or fleece. Let sit 5 minutes in the water, to absorb it. Squeeze out the excess water and drain the remaining water. Put the wool back in the pot, and drizzle CIBA dyes dissolved in water over the wool, as above. Squeeze the yarn to distribute the dye. Add water at the sides of the pan, to 2 inches depth. Seal with foil, and bake for 350 degrees for 1 hour. Drain, soak in warm, soapy water, and then rinse til clear. Let the wool sit in the rinse for 1/2 hour, then spin it to get the excess water out, and hang to dry.
This isn't rocket science. Trial and error is best. Just make sure you're in a well-ventilated place, and don't use the roasting pan for anything except dyeing.
I found some interesting colour combinations:
blue - red - yellow
teal - blue - purple
green - blue - fuschia
Just avoid mixing too many colours, because it will get muddy-looking, and try to use colours that are more than just a few shades from each other.
<<
Some color combinations I enjoy are
Blue-Purple-Red to produce a harvest berry look
Red-Yellow-Blue to produce a firey harvest look
Until next time...