Showing posts with label wood. Show all posts

5/24/2007

Mail call!! Making a new gadget...

MAIL CALL!! I finally got the yak I ordered off ebay.


This is some super soft and lightly carded stuff! At 8 ounces for just over $13...this was a steal even with shipping costs!!

I am gonna gander at making another new gadget. A Mother Marion kick spindle. You can see one in action here:

http://www.youtube.com/watch?v=kKXca2l0RPo

I have some arrow shafts from when I was into archery that already have the metal points on them. This is perfect. I have lots of scrap wood and I bought a lawn mower wheel of which I will have to either rip out the ball baring center or clue it in place.


Until next time...


***All content is Copyright year of posting to C4G/CCW unless otherwise noted.***

4/14/2007

Made a Lucet, SP10


I made a lucet today! I was in need of one to make a cord for my felted bag so I used some of the oak scraps I have from making my belt display. It reminds me of a goddess figure...of even a swim suit! Totally by accident! But it works great! Now if I were to purchase one of these...I'd be spending anywhere from $20-$40 for one. I have enough scraps left over to make 10 at about $4 each (after cutting, sanding, staining, and sealing)! I'm thinking of making another one for my SP10 pal-ee who BTW recieved her first box and she sounds thrilled to have the spindle and fiber! EEEEEEeeeeeee! *Warm fuzzies!*

I have been working on all sorts of things today. I cleaned Zar's cage and the same corner where he is located. There is a bookcase there and some of the books had fallen out and being the chaotic and scattered person I am, they were left on the floor. So those got picked up and tiddied. Zar's cage smells much better!

We went to community pharmancy today and I bought that jar of Lanolin. I attempted to waterproof my felted bag...but I think I may need to wash it some because it came out...sticky. HUmmm...that didn't work like I thought it would. Oh well. The only thing lost is time as I have to work on getting it not so sticky. Then while up on State Street I stopped by the local artist supply shop and purchased some salmon and purple dye. The BF had to stop in one of the metaphysical stores...the one I really don't care for (Shakti) because they are so materialistic and thier prices are high on those materialistic goods. I can do without all of it....BUT... I did find a new bumber sticker...a mini one that says "Religion is a journey...not a guilt trip." I LOVE IT!!! GODS! My coworker is always beating herself down...drives me NUTTY!!! The Womyn has no value or confidence in her own skills. And she is SO PSYCHIC! Shetold me about a dream that she had and she told me in that dream that we were trying to save a fish...and I was giving her a fish for her Bday!! PSYCHIC MAN!!!

BUT, what really has me peed this weekend about that subject is she really has been ungreatful for the gift. She talked and talked and talked about wanting to get a fish again and I thought I was gonna do a good thing. NO! She keeps COMPLAINING that she doesn't have TIME to take care of a FISH. *scratching head* WTF?!! It's a FISH, not a cat or dog or any other exotic animal....A FISH!!! For crying out loud, it won't keel over and die if it is not fed every stinkin day so go take your weekend trips!! *face-palm* GRrrrrrrrrrr. Then she said that she thought she was gonna have to give it away and I told her flat out-if you don't want the critter, give 'em back because he is GORGIOUS and has gorgious long blue fins. If she gives it away to someone, I will be very upset at her. All that effort to print out care sheets, purchase everything she needed to get started and keep 'em healthy and happy for several months if not longer and then WHAM...GRRRRRRrrrrrrrrrrrr, arrrrrrrrrrrrgh...That is the last time I get a gift for any coworker! The nerve!

Other than that, it's been a quite weekend. All the lists I am a member too are quite so it must be nice weather all around. CRAP...I just remembered that I need to bring the plants in because it is still getting below freezing at night. POOP....

I


Until next time...

4/03/2007

Belt Display Rack-Easy...Patience? HARD!!!

I am so excited about this latest project, a display rack for my karate belts. Why buy one premade, when I can make one for half or less of the price? I see them being sold on Ebay for $20 plus $10 shipping...but for that much money, I can buy all the supplies I need and then some to make my own. Granted it LOOKS handmade, but that is a BONUS plus I can say "I made it" to those who inquire. Right now there are only slats for four belts, but come payday I will get enough oak boards to make a 10 level rack.

I used 1/4 wood pegs to stick the boards to the back dowels which are square hardwood dowels. I love Menards! I then drilled a 1/4 hole through all the slats at once so that they would all have the same off center holes. LOL Then I took each slat, number then and placed them on the dowels and marked where to drill the connecting 1/4 holes. A bunch of pounding later, they are attached without the use of unsightly screws and nails. I had to saw off the ends of the pegs and sand them flush to the boards before applying stain (classic cherry) and right now a layer of poly is drying on them. This is so simple to make!! All I will need to display the belts is some double sided velcroe strips (the kind they sell to keep cables organized).

It needs a headboard. I looked at one of the Goodwills to see if they had something about 2 feet long that I could paint over but they did not. I am not sure what kind of headboard I will add, but I will want to engrave it. I think I can do that with the router attachment for the dremal tool. I'd like to engrave my name in Chinese characters and then engrave my name in english below it. That sounds too fancy for my skill level though. Wood engraving would cost too much I think so maybe I will just get some asian rub-on accents if I can find any and then just add my name in wood letters so it pops out. Hummm...I still have some money left on my Bday Hobby Lobby gift card....time to hit the place again!! One of the wood hobby shops should have already shaped headboards with routed edges. I'll have to browse online first to see what is available.


Until next time...

2/21/2007

Floor Skien Winder...from conception to completion

Skien Winder-Full
The Bolts
Mitered and glued together
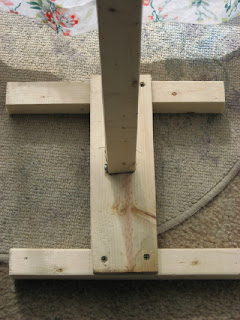
The Base
Side View-Notice the peg that angels down

I have been, for the longest time, been trying to buy myself a swift. But, I've never gotten around to it because I think they cost too much for what they are. So what do I do? You guessed it, I went and bought some supplies to make my own. I took the plans for the Build a Little Great Wheel put out by Interweave's Spin-Off and adaped the connection of the wheel to the frame of the home-made wheel to the constuction of this floor model swift/winder/what-cha-ma-call-it. Now this is a super ruff construction, made only to be functional...not decor ready. But, it works and I spend under $10 on it's construction and all supplies were bought at the local Menards. The skien size I get from this is is 29 inches...plenty big for the average skien. If I ever want to make a larger skien for self stripping yarn, I only seen to go and buy longer oak boards and construct a wider cross. It works great the way it is, although I need a slightly longer bolt as one of the arms keeps hitting the body of it. The base needs to be a bit wider, or I need to make a stabelizer as it tends to wobble, but for now I can put my foot onto the base to hold it steady. I used two oak boards at 1/2" x 2" x 2' for the arms and mitered a small portion out of the center of both of them, then glued them together with Gorilla glue. You will want a dowel, I used one three foot dowel and cut it every 7 inches. This will give you 5 pegs with one being a little longer than the rest. This one will be your "handle" for turning the device. Find a hole borring bit that is the same size of the dowel you have chosen. I used 5/8th dowels and so used a 5/8th bit.

Before drilling a hole in the center of the boards you want to try and find as close to the exact center as possible without having to purchase further equipment (think frugal). Then measure from each end and mark one inch and two inches. Mark the center (as close as possible) between the one and two inch marks. This gives an inch of board sticking out to hold the yarn on the pegs. C-clamp both boards together and drill all the holes through both of them at once. Unclamp the boards and drill ONE MORE hole in ONE BOARD between the center hole and the end hole. This is where your handle peg will go.

Miter out (either with hand chisels or a dremel if you have one) a "thumb-nails" worth of wood...about 1/8 of an inch...or one quarter of the boards thickness. Miter them out so that the holes will match up when glued together. Sand the mitered portions lightly..ready, set, Gorilla Glue! Place a clamp on the glued pieces and let sit overnight. Love that gorilla glue!

While that is drying, construct the base. You may want to make something wider than I have, so I will not include the base construction here. For the main post, I used 2x2 square fence post boards that are super cheap, and super dry. You will want to seal these with some tung oil (or some other kind of wood oil) to keep them from splitting in the future. About 4 inches from the top of the pole, mark as center as possible and drill a hole slightly smaller than a 1/4 5/16 bolt. You want to pre-drill the hole to keep the wood from splitting, but you want it slightly smaller so that the threads will catch.

The next day gather up a 3 1/2 4 inch long 1/4 5/16 hex carriage bolt (preferably one that has about an inch near the top of the bolt that has no threads-if that cannot be found follow the intructions for making the "Wheel Shaft Carriage Bolt", page 3, of the PDF for making a little great wheel), two three regular 5/16 nuts, one 5/16 lock nut, and 4 washers that will fit the bolt. I drilled too big of a hole through the main shaft so I used wider than usual washers to steady the resulting wobble so I had to drill a slightly smaller hole above it with a 3/8 hole borring bit.

To put everything together, add a washer to the bolt, put the bolt through the cross arms (after glue has dried) first. Now add one washer andone two nuts. You want to leave a small space between the first nut and the cross arms so there is enough room for the arms to swing freely, but not wobble, then tighten the second nut snuggly up to the first one. This keeps the first nut from coming unscrewed with continued use. Now add one more washer and insert the whole get-up through the main shaft. Add the last washer, and the lock nut. Hand tighten only. Now slide the pegs through all the holes and take pride in your newly made yarn winder. (BIG GRIN). I did not glue the pegs in so that I could take it apart for storage if I need to in the future. The pegs did not fall out when I tested it-although one peg is pointing downwards slightly because I do not have a bench press to drill perfectly stright holes with. What I will likely do is simmply add some rubber O rings to the ends to help prevent yarn from rolling off. My test skien did not roll off.

If you have any questions on the construction of this nifty home-made thang, feel free to ask. Be as specific as possible because "It's not working for me." will not enable me to help you at all.


Until next time...

Revised: 2.22.07

2/02/2007

My Hand-Made Shuttle Beater

WOOOOOooohoooooo! Done! I've been seeing these on Ebay and it looks simple enough to make, and it was simple to make. I used 1/4 inch thick oak board from Menards to make this one and a routing attachment gadget for the dremal. As soon as I figure out how to put on a fresh sand paper cover on the drum sander bit...I'll pretty up the inside of the yarn holding...hole. I don't know the technical word for it. It's a shuttle...it's a beater...it's a Shuttle Beater! Took about 20 minutes to plan, cut and sand out.


Until next time...